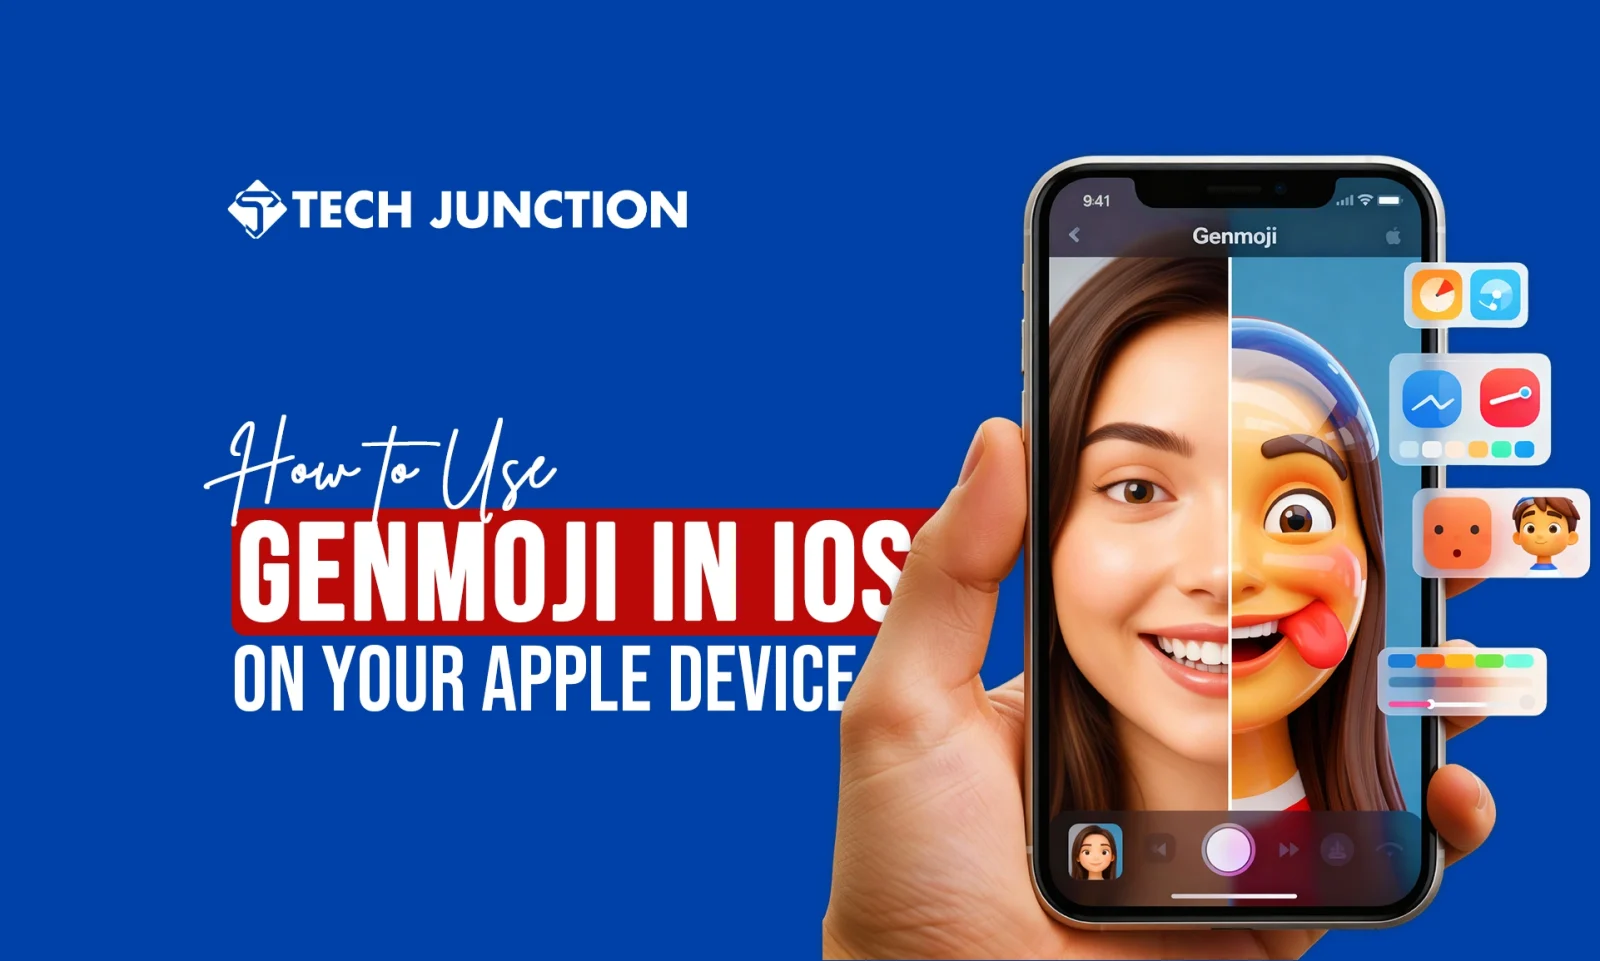
We have all wanted an emoji that perfectly captures a very specific feeling or inside joke. Learning how to use Genmoji in iOS 18 opens up a whole new world of creativity on your Apple device.
Genmoji is Apple’s AI-powered emoji generator that lets you conjure up custom emojis from text descriptions or even photos. In other words, it’s like an Apple emoji maker built right into your keyboard, allowing you to create emojis of anything you can imagine—from a “mouse in a helmet riding a motorcycle” to a mini avatar of your best friend.
In this comprehensive guide, we’ll explain what Genmoji is, how to get it on your iPhone, and step-by-step instructions for making your own Genmojis. We’ll also cover tips for the best results, where you can use these new creations, and answer frequently asked questions about this exciting iOS 18 feature.
1. What is Genmoji
Genmoji (a blend of “generative” and “emoji”) is a new feature in iOS 18 that uses generative AI to create custom emoji-like images. It is Apple’s take on personalized emojis.
For decades, we’ve been limited to the standard emoji set on our keyboards, but Genmoji changes the game by letting you generate entirely new emojis on the fly. Simply enter a prompt describing the emoji you want, and Apple’s AI will draw it for you as a tiny graphic you can send just like any regular emoji or sticker.
As Apple’s official support page explains, “with Apple Intelligence, you can create custom emoji—called Genmoji. Simply describe what you want the Genmoji to look like… or create one of friends and family based on their photos”.
Genmoji was one of the most anticipated features of iOS 18 when Apple announced its new Apple Intelligence suite at WWDC 2024. It’s not hard to see why.
Genmoji gives you a new way to express yourself. You can incorporate Genmojis directly into text, copy and paste them, or send them as stickers just like standard emojis. They can even be used as Tapback reactions in iMessage conversations, replacing the default thumbs-up or heart with your own mini masterpiece.
And thanks to a clever Apple API (NSAdaptiveImageGlyph), these AI-generated emojis behave almost exactly like regular emoji characters in apps that support rich text. In short, Genmoji brings unlimited emoji customization to iPhone and iPad users, all while integrating seamlessly into Apple’s ecosystem.
2. Why is Genmoji a Big Deal
For one, it’s incredibly fun and personal.
“The integration of Genmoji into Apple’s ecosystem is incredibly fun, creative, and a great way to add more expression to any conversation,” as one early reviewer noted.
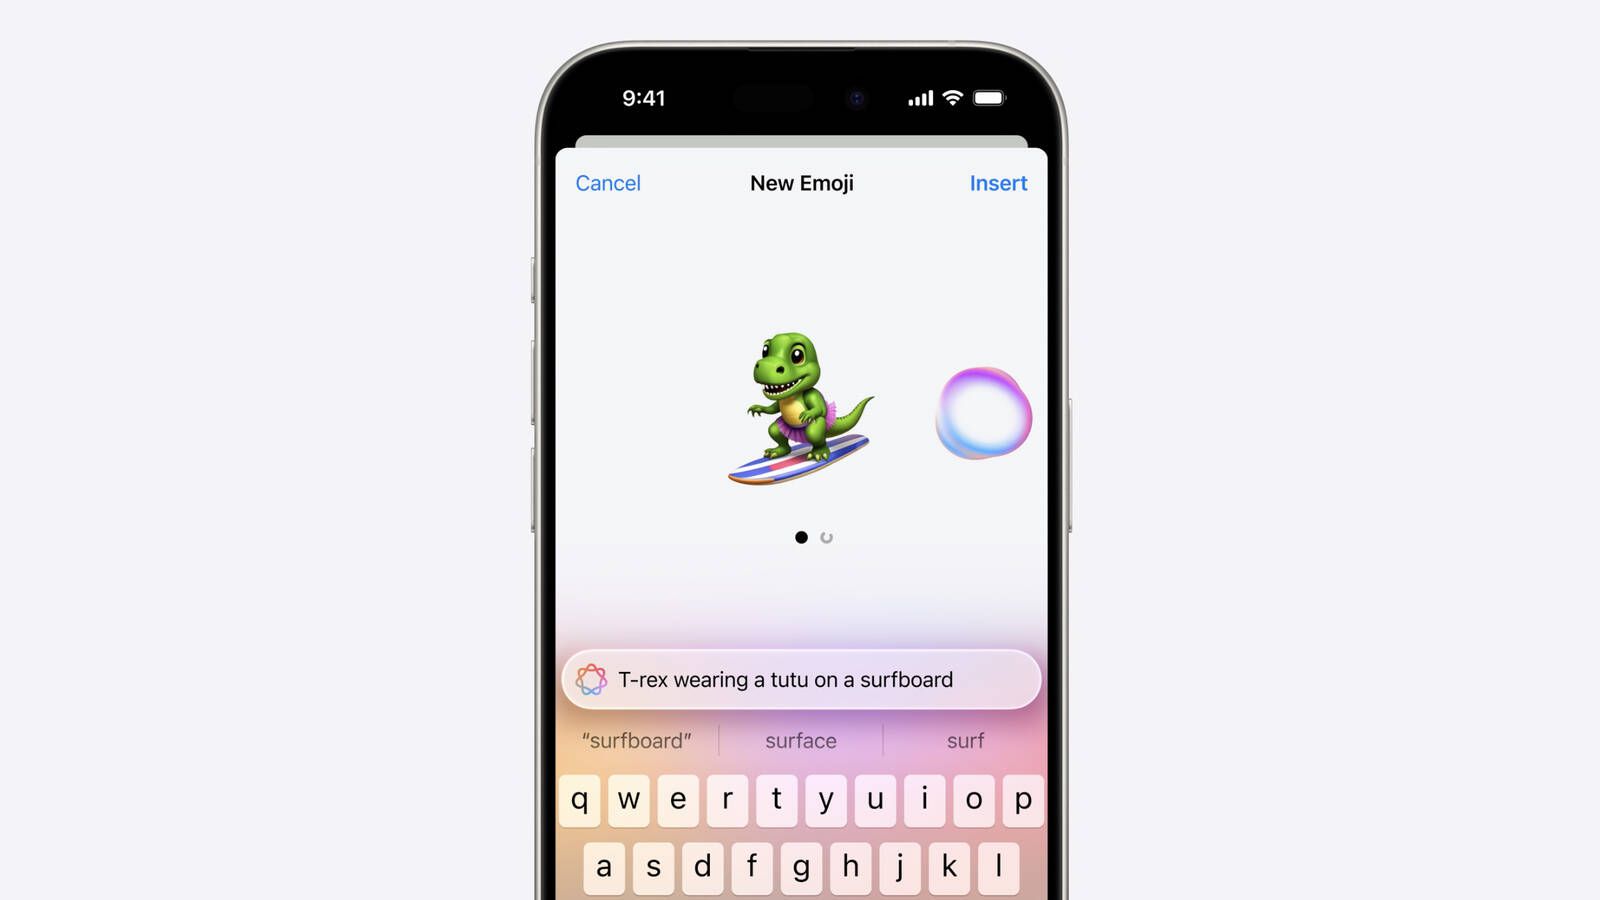
For example, Apple’s demo showed prompts like “smiley relaxing wearing cucumbers” (for that spa-day vibe) or “T-rex wearing a tutu on a surfboard” to generate delightfully quirky emoji stickers. You can even turn real people into emojis – your friends, family, or yourself – using a photo as a reference. That means creating an emoji on iPhone from a photo is now possible without any third-party apps.
Of course, Genmoji is still a new technology and not without limitations. Apple keeps it on strict content rails to ensure the outputs remain friendly and safe.
In practice, Genmoji usually “gets things right a lot” but can struggle with very complex or detailed prompts. Remember that these are tiny images – if you pile too many elements into your description, the final emoji might be hard to read at its small size.
In early use, reviewers found that extremely detailed scenes may yield muddled results once shrunken down. Also note that Genmojis are currently device-specific images. If you send a Genmoji to someone on Android or an older iOS, it will appear as a normal image in the message (because it’s not part of the universal emoji font).
Still, within the Apple world, Genmojis act almost like native emojis and are stored in your emoji keyboard for reuse. Now that you know what Genmoji is and why Apple fans are excited about it, let’s make sure your device is ready and learn how to get started.
3. Genmoji Release Date and Device Compatibility
Before you try to find Genmoji on your phone, ensure you have the right device and iOS version. Genmoji wasn’t available at the initial iOS 18 launch; Apple officially rolled it out in iOS 18.2, which was released in December 2024. (In fact, December 11, 2024, was the Genmoji release date for most countries, with a slight delay to early 2025 in the EU due to regional rollout schedules.)
The first step is to update your iPhone or iPad to iOS 18.2 or later. On your device, go to Settings > General > Software Update and make sure you’re up to date.
Next, you’ll need a compatible Apple device. Genmoji is part of Apple’s Apple Intelligence features, which require a lot of processing power for on-device AI. Currently, Genmoji works on the following devices (at minimum):
- iPhone 16 (and newer, when applicable) – Apple’s 2024 iPhone lineup comes with the needed AI horsepower.
- iPhone 15 Pro and 15 Pro Max – The 2023 Pro models were the first iPhones with Apple’s advanced neural engine capable of running Genmoji. (Notably, the standard iPhone 15/15 Plus do not support Genmoji, as they lack the required chip.)
- iPads with A17 or M-series chips – For example, the iPad mini (6th gen) with A17 chip, or any iPad Pro/Air with an M1 or M2 chip, can use Genmoji. iPadOS 18.2 introduced Genmoji for these high-powered iPads as well.
- (Coming soon) Macs with Apple Silicon – Apple has indicated Genmoji will arrive on the Mac with macOS Sequoia (likely for M-series Macs), so you’ll eventually be able to generate emojis on your MacBook, too.
Tip: If you have a supported iPhone/iPad and still don’t see the Genmoji option, double-check your iOS version (needs 18.2+). Also verify that Apple Intelligence features are enabled.
By default, they should be. But you can go to Settings > Apple Intelligence & Siri and make sure the toggle for Apple Intelligence is on. In some cases (especially if you were on the beta), you might need to enable the “Stickers” option under Settings > General > Keyboard to make Genmoji visible on the keyboard.
The rollout had a few quirks – for instance, during the beta period Apple required users to request access via the Image Playground app. As of the public release, however, Genmoji should show up automatically once you meet the criteria.
Now that your device is set, let’s dive into how to get Genmoji up and running and actually create your first custom emoji.
4. How to Get Genmoji on Your iPhone (Setup)
Getting Genmoji on your iPhone is straightforward if you have a compatible device. Here’s a quick setup checklist:
- Update to iOS 18.2 or later: As mentioned, Genmoji lives in iOS 18.2+. Head to Settings > General > Software Update and install any pending updates. This ensures your phone has the Genmoji feature files.
- Enable Apple Intelligence: After updating, Apple Intelligence (the umbrella for Genmoji, AI Siri, etc.) should be on by default. To be sure, go to Settings > Apple Intelligence & Siri and verify it’s toggled on. If you don’t see an Apple Intelligence menu, your device likely isn’t supported for these features.
- Open the Messages app (or any app with text input): Genmoji is accessed via the emoji keyboard. It doesn’t have a separate app icon on the Home Screen (though you might notice a new Image Playground app after updating – that’s Apple’s AI image generator, which also ties into Genmoji). Don’t worry about that for now; you can use Genmoji directly from the keyboard in Messages, Notes, Mail, etc.
- Access the Emoji keyboard: In a text field, tap the smiley face icon on the keyboard (🏵️ on the iPhone keyboard, to the left of the space bar) to switch to the emoji picker. On iPads or if you use multiple keyboards, you might need to tap the globe icon 🌐 and select the Emoji keyboard.
- Look for the Genmoji icon: On the emoji panel, look at the top or bottom bar of the keyboard UI. Apple revamped the emoji keyboard to include sections for standard Emoji, Memoji, Stickers, and now Genmoji. The Genmoji icon looks like a multicolored smiley face with a “+” plus sign. Tap that, and you’ll open the Genmoji creation interface.
If everything is set up, tapping that Genmoji icon will bring up the Genmoji creation window. Now you’re ready to actually create something! In the next section, we’ll walk through step-by-step how to use Genmoji to design your own emoji.
5. How to Use Genmoji: Creating Your Own Emoji (Step by Step)
Using Genmoji is delightfully simple. Once you have it enabled, you can whip up a custom emoji in seconds. Let’s go through the step-by-step process to create a Genmoji on your iPhone:

- Open an app and bring up the keyboard: For example, go to the Messages app and start a new message (you can also do this in Notes, Mail, or any app where the emoji keyboard is available).
- Switch to the Emoji keyboard: Tap the emoji (smiley face) icon on your keyboard. The familiar emoji picker should pop up.
- Tap the Genmoji icon: On the emoji picker interface, find and tap the Genmoji (🧞♂️🎨) icon at the top-right corner. This opens the Genmoji creation panel, which might say “New Emoji” at the top of your screen. You’ll see a text field and possibly some suggestions or example elements at the bottom.
- Enter your description (prompt): Tap the text box (it might say “Describe a Genmoji…”). Now type a few words or a phrase describing the emoji you want. Be creative but concise. For example, you could type “chocolate ice cream on a cone”, “happy dog with party hat”, or “unicorn flying over a rainbow” – whatever you fancy. When done, hit Return or tap the Done button.
- Generate and preview: After you submit your description, Genmoji will take a moment to create options for you. Within a second or two, you should see a preview bubble with a generated emoji graphic matching your prompt, and possibly several variations you can swipe through.
- Pick your favorite Genmoji: Once you’re happy with one of the generated options, tap the Add/Insert button on that Genmoji. On iPhone, this might appear as an “Insert” label at the top or a checkmark ✔️. Tapping it will add the new Genmoji to your emoji picker. It usually lands in your “Frequently Used” emoji section or a special Genmoji sticker shelf. You should now see it among your regular emojis in the keyboard.
- Send or use the Genmoji: Now just tap the newly created Genmoji from the emoji drawer to insert it into your message or document.
Fine-tuning your Genmoji
Don’t hesitate to iterate on your prompts. If the first try isn’t perfect, edit the description or add a detail and watch Genmoji come up with a new set of images. For example, one tester found that the prompt “embarrassed and awkwardly nervous” kept giving a generic sad face until they tried a more literal angle.
Sometimes changing a single word or using a more direct description yields a better emoji. Also, because Genmoji is still technically in beta (as of iOS 18.2–18.5), you might run into occasional glitches or repeated designs.
It’s all part of the creative process, and you should think of it like brainstorming with an AI artist. Keep prompts short and clear for the best results, and remember that overly complex scenes might be “auto-simplified” by the AI to fit the emoji format.
Using photos for Genmoji
One of Genmoji’s coolest tricks is turning real people into emoji caricatures. To do this effectively, ensure the person’s face is clearly visible in the source photo and that you’ve tagged their name in your Photos app (so that Genmoji can find them).
When you tap the person icon in Genmoji and choose a photo, the tool will generate an emoji face or figure with a resemblance to that person. You can then apply styles or contexts to it by adding text descriptors.
For instance, “Alice as a chef” could produce a Genmoji of your friend Alice in a chef’s hat holding a spoon. If it doesn’t look quite right, Genmoji lets you edit the starting point so you can pick a different photo or adjust attributes like hairstyle, skin tone, or glasses in an editor menu.
This customization menu is similar to the Memoji editor, allowing you to tweak the Genmoji avatar for a closer likeness. Feel free to play around until your friend-emojis look spot on!
Final Word
Apple’s Genmoji brings a dose of personalized fun to messaging. Now that you know how to use Genmoji in iOS 18 on your Apple device, you can wow your friends with one-of-a-kind emojis and truly customize your emoji experience.
From a pizza-loving unicorn 🦄🍕 to a tiny emoji portrait of your pet, the creative possibilities are endless. Happy Genmoji-making, and enjoy adding that extra spark to your conversations!
FAQs: All About Genmoji in iOS 18
Q: How do I get Genmoji on my iPhone?
Update to iOS 18.2 or later on a supported device (iPhone 15 Pro, 16 series, or M-series iPads). Then go to your emoji keyboard and tap the Genmoji icon.
Q: Genmoji is not showing up – what do I do?
Ensure you’re on iOS 18.2+, then check Settings > Keyboard > Stickers. Restart your device if needed.
Q: How do you create an emoji on iPhone from a photo?
Open the Genmoji tool, tap the person icon, and choose a photo. Apple’s AI will turn it into an emoji-style face.
Q: Can I use Genmoji in apps like WhatsApp, Instagram, or email?
Yes. Genmoji sends as an image or sticker, so you can paste it into most messaging and social apps.
Q: Are Genmojis real Unicode emojis? Will they show up for everyone?
No. They’re custom image-based emojis that work best within Apple’s system. Others see them as pictures.
Q: What about the “new emojis in iOS 18” – are those different from Genmoji?
Genmoji are custom, AI-generated. iOS 18 emojis are standard Unicode updates available to everyone.
Q: Does Genmoji cost money or require a subscription?
It’s free with iOS 18.2+ on supported devices. No subscription needed.
The Tech Junction is the ultimate hub for all things technology. Whether you’re a tech enthusiast or simply curious about the ever-evolving world of technology, this is your go-to portal.


